

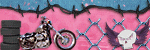
Tube, Full body and close up.
Artwork I am using is by Ismael Rac. You need a license to use his work and you may purchase one at AMI.
Template #13 by ME, you can download it from my blog HERE
Scrapkit, Good Girl Gone Bad, by 3Ps in a Pod.
Mask 203 by WeeScottLass download HERE and put in your PSP Mask folder.
Filter used:
Filters Unlimited 2.0 - Gradient and Aged Film
Penta.com Color Dot
Vanderlee Unplugged - Interlace
Open template and Shift+D to duplicate. Then delete Credits layer. I also deleted the torn heart layer. I didn't like the way it looked for this tag LOL
Add a new Raster layer and drag all the way to the bottom. Flood fill with black and apply mask by going to Layers-Load/Save Mask-Load mask from disk and pick WSL_Mask302. Merge Group
Now activate the Rectangle layer and use your magic wand to select it. Now open paper_3pp_19. Copy and paste as a new layer. Then go to Selections/Invert and hit delete. Deselect and apply dropshadow, H&V-0 Opacity-80, Blur-9. Delete orginal rectangle layer.
Now activate lefthalfcircle and use selection wand to select it. Smooth your selections by going to Selections/Modify/Smooth #10 in both options. Now choose 2 contrasting colors from your tube, or scapkit you are using for the foreground and background. I chose a teal and pink color. Flood fill with the foreground color. Then use Filters Unlimited, Filters Unlimited - Gradient, Radial Fore to Background with default settings. Then use Vandlee-Unplugged-Interlace at default settings. Deselect apply dropshadow
Now activate frontlefthalfcircle layer and select with magic wand. Smooth you selection again and flood fill with a color of choice. Now go to Penta.com and use the jeans filter, default settings. Now deselect.
Open your close up tube and copy and paste as a new layer. Position it on the lefthalf circles layers then duplicate the tube layer. Drag the duplicated layer down under frontlefthalfcirle and then hide that layer.
Select your frontlefthalfcircle layer and select it by going to Selections/Float, them defloat. Now make your tube layer active and go to selections/Invert and hit the delete key. Now deselect. Change the layer properties on the tube layer to Luminance (L)
Now unhide you duplicated tube layer. select lefthalf circle the same way as you did for the front one and then activate your tube layer and invert selection and delete. Deselect and change the layer properties to Multiply.
Now on to the right side.
Now activate righthalfcircle and use selection wand to select it. Smooth your selections by going to Selections/Modify/Smooth #10 in both options. Now choose 2 contrasting colors from your tube, or scapkit you are using for the foreground and background. I chose a teal and pink color. Flood fill with the foreground color. Then use Filters Unlimited, Filters Unlimited - Gradient, Radial Fore to Background with default settings. Apply dropshadow
Now activate frontrighthalfcircle and select it and smooth selection. Flood fill with color of choice and use penta.com jeans filter at default settings.
Now copy and paste your tube as a new layer. Postition it where you like it and duplicate it. Drag the duplicated layer down to just above righthalfcircle.
Now activate the original tube layer and invet selection. If you accidently deselected it thats cool. Just make it active and go to selections/float/ then defloat.
Now change the layerproperties on the tube layer to Mupliply. Deselect
Now activate righthalfcircle layer and go to selections/float then defloat. Unhide your duplicate tube layers, Invert selection and hit delete. Deselect. Now change layer properties to Soft Light.
OK are you ready for a break LOL go ahaead, I'll still be here when you get back ;)
Back already? Did you being me some coffee cuz I need it! LOL lets keep going.
Now activate your vertical lines and use your magic wand to select them. Open paper_3pp_7 and copy and paste as a new layer. Duplicate the paper and hide it.
Now with the paper layer active invert your selection and hit the delete key. Deselect and apply samedropshadow as before.
Now unhide your other paper layer and free rotatae it 90 degrees to the left. Activate your vertical lines and use your magic wand to select them. Then with your paper layer active again invert the selections and delete. Deselect and apply dropshadow. Delete the vertical line layer
Now the wordart. First on the "Good Girl gone" use the dropper took to select the gray colors as a your background. Now make your foreground a pink color or whatever color you like. Then in the same dropdown menu as the dropped is a color replacer tool. Use it to change the gray to pink.
Next we are going to do "BAD" First select the B with you magic wand and smooth the selection. Flood fill with pink or a color of your choice. Now you can add an effect if you want. I did Penta.com Jeans
Now the letter A select with magic wand, smooth selection and fill with purple or a color you want. You can add a filter if you desire. I used Penta.com Color dot, Distance 10
Now the letter D select with magic wand, smooth selection and fill with teal or color you want. Filter I used is FilterFactory- Special Effects - Aged fill and I changed that Desatuation to 5
Now copy and paste your full body tube. Postition where desired. Apply dropshadow
Now its time for the elements
Activate your mask layer and copy and paste wiremesh_3pp_4 as a new layer. resize to desired size.
Activate frontrighthalfcircle and copy and paste bike_3pp_2 as a new layer and resize as needed.
Activate BAD layer and copy and paste cuffs_3pp_3 as a new layer. Resize them 40% and move them to the bottom of the D erase part of the chain so it looks like the the cuffs are going through the D. See my tag for example
Open sticker4_3pp and copy and paste as new layer. Move up to the upper left circle. resize by 30%
Open element_3pp_10 and copy and paste as a new layer. Move to right above the Good Girl Gone layer.
Now you can add more elements or leave it as is. Don't forget your copyrigt info and name!
Thank you soo much for trying my tut and would love to see your creations.


No comments:
Post a Comment